Understanding BLoC in Flutter App
A few days ago, I started thinking about what is the correct way to architecture my Flutter projects. Untill recently, I wasn’t building anything big using Flutter, but once I started with medium scale application using Firebase and other APIs, it became harder to manage State of widgets in application.
Even a small change in Text widget somewhere deep down widget tree, made the whole tree rebuild, which apparently would cost a lot in terms of performance, and I wouldn’t feel proud of the app I built myself. 😅
So, I thought, let’s find out how other Flutter developers are dealing with this… and boy, was I surprised. There are literally so many of way to “structure” the application to manage State of app.
- Redux
- MVC
- MVVM
- MobX
- BLoC
- Provider
- Scoped Model
- lots other…
Yep, I was overwhelmed as well, just like how you might be right now.😅
But as soon as I came to know that Google introduced the BLoC at Google I/O 2019, I figured, let’s start there.
In this, article I am going to describe pretty much everything I understood about BLoC in Flutter, from introduction to implementation.
So, in case you are already experienced with BLoC, this article might not be what you are looking for.
On the other hand, if you are itching to get started with structuring your app nicely, come join me on my journey.😋
..
..
..
Still here, eh? 😁 That makes me happy. It’s gonna be a long journey…
Umm, Why are we interested in BLoC again?
That’s a very good question. Let’s imagine that you have built some app like normally, using setState(), and your widget tree is pretty deep. Now we don’t want the whole widget tree to rebuild on just a change of one small part. To do this, we will have to efficiently manage state, hence, state management. (I repeat, State Management, not stress management.😝)
Oh yes, if there is only few widgets that needs this type of consideration in your app, you can use Streams and StreamBuilder to ensure that minimal rebuilds happens in your widget tree.
Umm, Stream…what?
Alrighty, Alrighty, we need to have solid understanding of Streams and StreamBuilder to understand BLoC either way, let’s take a little detour.😉
Streams and StreamBuilder
In layman’s term, we can say “stream” is an asynchronous sequences of event or data. Let’s take an example of conveyer belt. The belt keeps moving on its own and we can put something like, a bowl of Ramen 🍜, on one end and it will eventually reach the other end. The end of belt where we put things, is called “sink” and the other end, where things (our ramen) will eventually reach is called “stream”. Next, someone else put a pudding 🍮 on “sink”, it will reach “stream” end eventually.
Well, sadly, we won’t be sending Ramen, or Pudding or Ice-cream in our streams of Flutter app, we can send in objects though, any type of object. And in Dart, everything is object.
There is a lot more that streams can do in Dart, Flutter. We will put all that aside for now.

Let’s see how these cats….ahem.. streams are useful.
The Flutter widget StreamBuilder is built to work with streams. Whenever a new event/data arrives on “stream”, it rebuilds just itself, automatically. Yep, no need to call setState() and rebuild your entire widget.
As we can see in the snippet above, StreamBuilder “listens” to given stream and when it recieve some event/data it will rebuild it’s assigned builder automatically, That’s a cool thing if you ask me. We are gonna leverage this in BLoC architecture.
Ok that’s enough detour, we are getting back to our original block… ahem, BLoC.
Enter the BLoC
BLoC means Business Logic Component.
Essentially, we try to separate the UI component of the app from Business Logic as much as possible, ideally, complete separation.

There are multiple ways we can implement BLoC pattern in our entire app. That is what confused me! Untill I realized,
BloC is not about what widgets, class, method, library we use to implement, it’s about separating UI from Business Logic.
Once I understood that, I was no longer overwhelmed. We fear what we don’t know.😅
Some of the implementations I found were
- Using
Streams from scratch - Using
RxDartpackage available on pub.dev - Using
blocandflutter_blocpackage available on pub.dev
First approach of building and managing all streams by scratch makes sense for a small project.
RxDart approach is more familiar for devs who are coming from reactive background of Rx observables.
I decided to go with 3rd approach, that is using bloc and flutter_bloc packages.
Hold up, isn’t this bit too much just for state management?
Hmmm…well, I will let you be judge of that.
Here are some of the gems you will have in your gauntlets of BLoC.
- Know what state your app is in, at any point of time
- Easily test Business Logic using appropriate testing methods like unit testing, etc.
- Recording every user actions that facilitate data-driven decisions
- Reusing components within app and across app.
- Fast and Reactive app

That convinced me to learn BLoC, I am hoping it will be same for you, too.😅
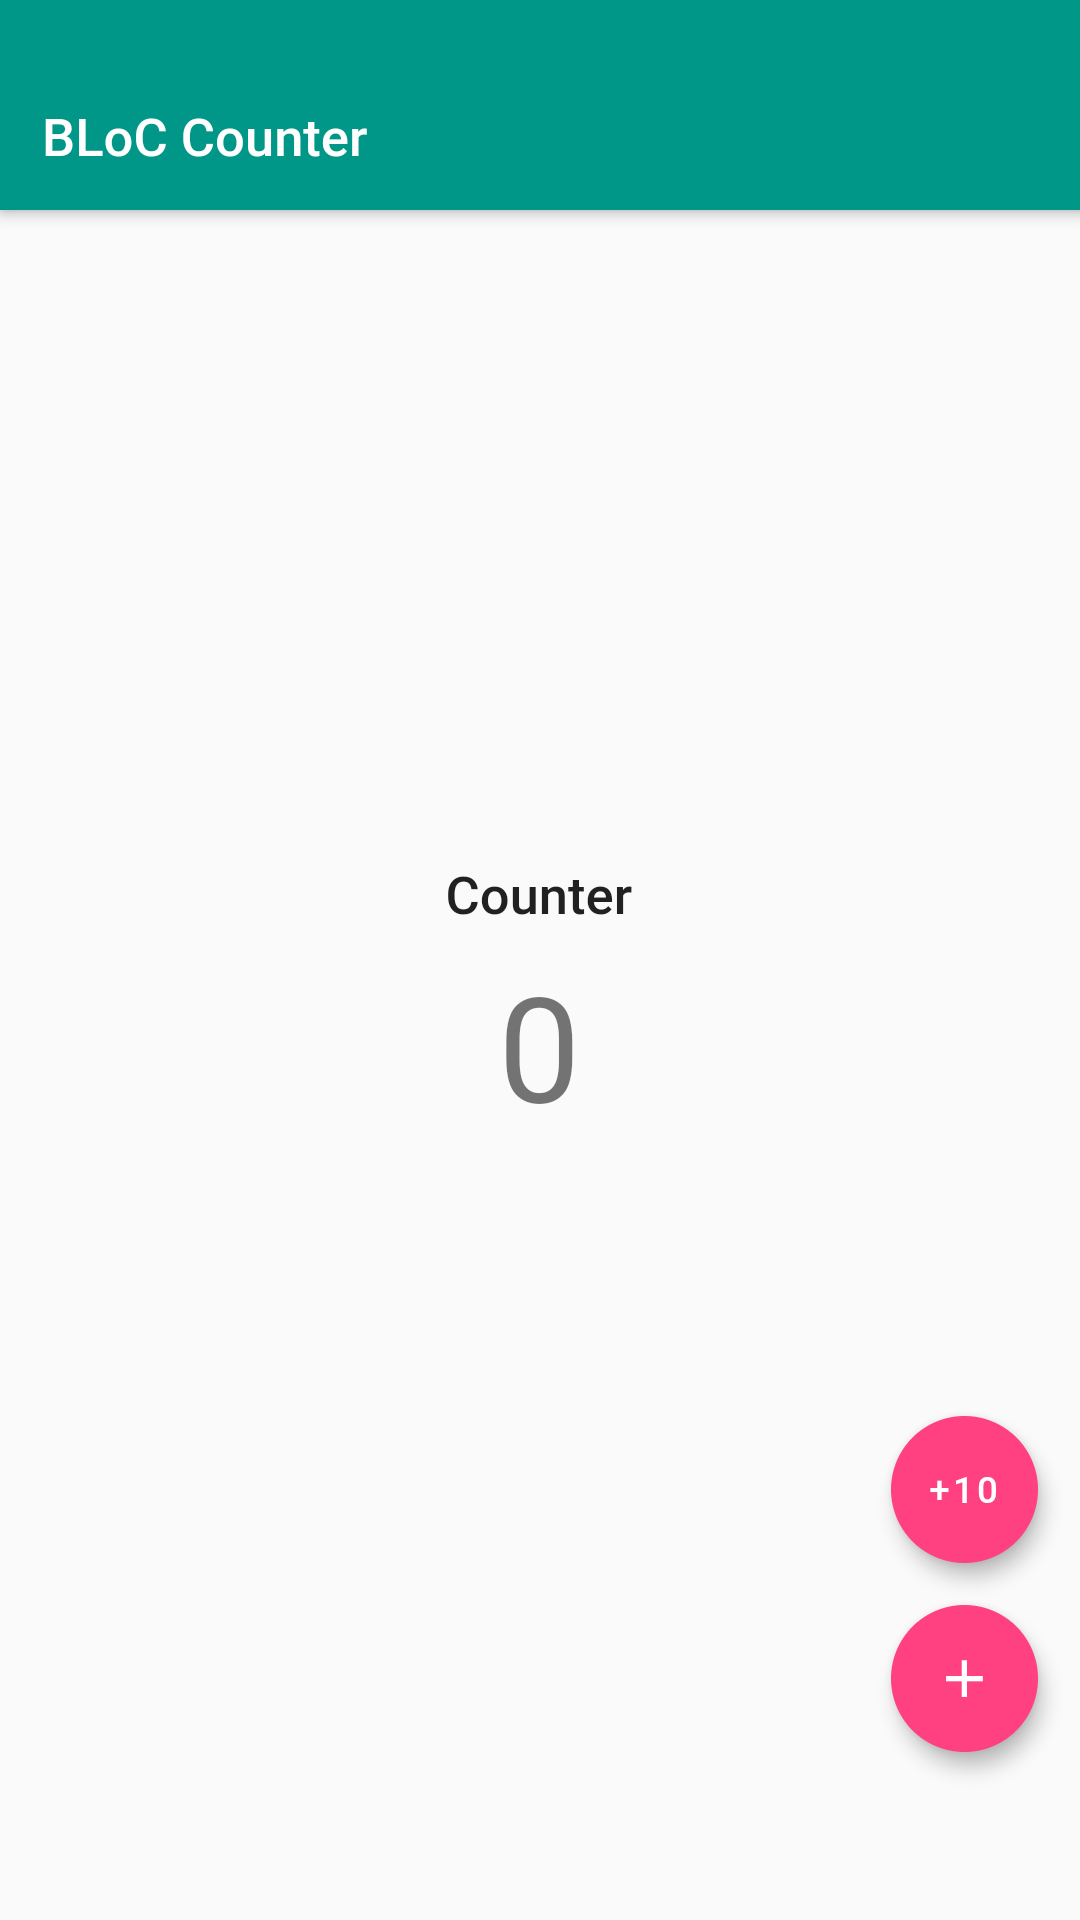
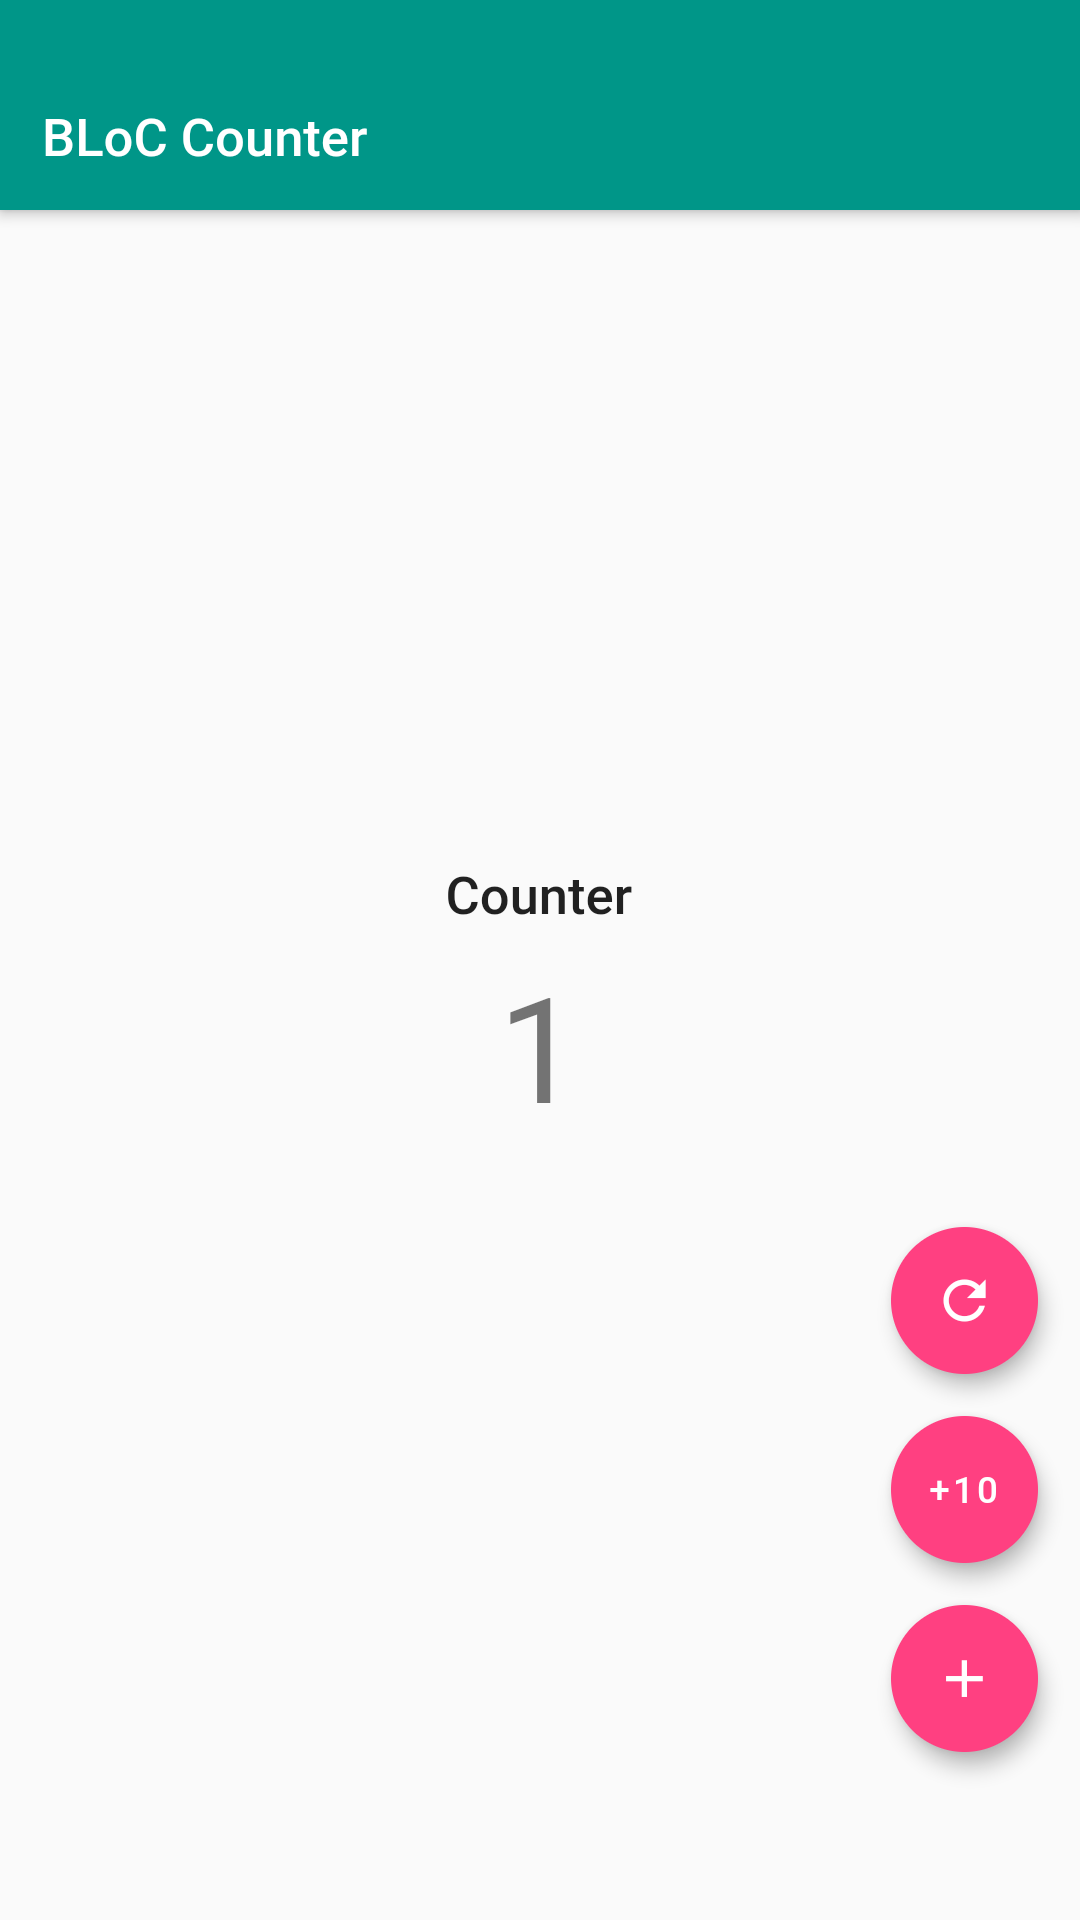
Yep, That’s a classic Flutter counter app that we have all seen before. Let’s put a little spin on it and use BLoC architecture to build this app.
Anatomy of our BLoC pattern
To put it simply, the bloc and flutter_bloc packages uses the InheritedWidget and Stream provided by Flutter to make Business Logic available in Widget tree.
On a sidenote, InheritedWidget is a widget that can pass the data it holds, down it’s childen any level deep. It’s pretty cool widget to talk about, just like Stream, but that’s a story for some other time or article.😅
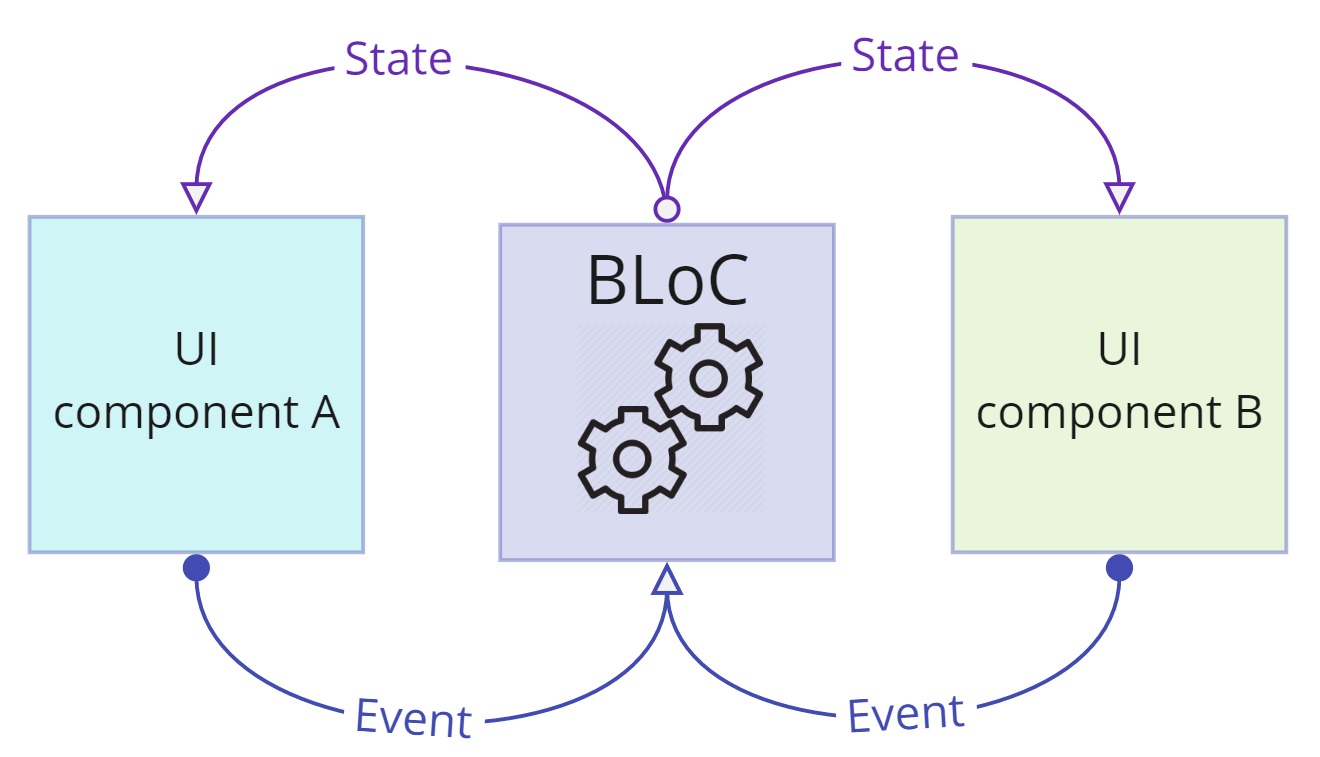
A BloC can be connected to multiple UI components through stream(s).
UI component(s) sends input to BloC as an Event.
BLoC contains some Business Logic that process this Event.
After processing, BLoC gives an output State of the BLoC.
UI component rebuild itself, if needed, according latest received State.
Take a breath and read that again.😆 (It’s important.)
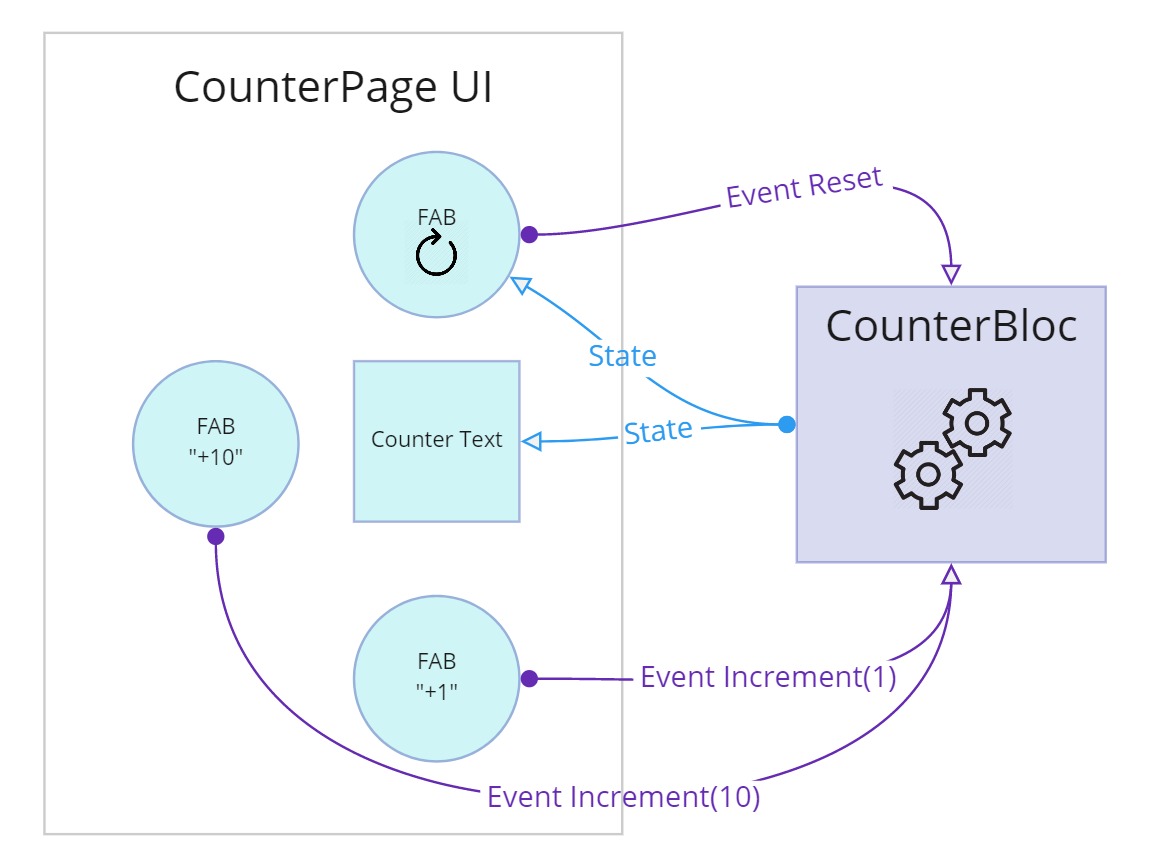
Let’s try to think about our precious counter app.
Only one component contains some kind of logic and that is the counter. So we make a BLoC called CounterBLoC.
The component that contains Business Logic of Counter is CounterBLoC.
Now, it’s upto us how to define the Events and State related to counter. How about this?
- Events (Inputs to BLoC)
- Increment (user want to increment counter)
- Reset (user want to reset the counter back to 0)
- State (Output of BLoC)
- Ready (counter is ready to start receieving user input)
- Running (counter is running/counting)
It all depends on what your project requirement is, what feature is available to use and etc etc. For example, we could also add an event called “Decrement” that describe that user want to decrease the counter value.
Also, for convenience, IntelliJ Editors and Android Studio have a nice little plugin that will automatically generates files for us to Develop in BLoC pattern. We will be using this too.
Setting up
- Make sure you have the bloc generator plugin installed in your editor. It’s not really necessary, but it will save us some work.
- Create a new Flutter project
bloc_my_counter.😅 - Add following dependancies in
pubspec.yamlof project. - Clear up the
main.dartfile with just the following for now. - Run the BLoC generator plugin. For Android Studio,
File > New > Bloc generator > New Bloc. Enter the desired BLoC nameCounter. Be sure to allow the usage ofEquatable.

A side note, Equatable class allows us to compare two object for equality, inituitvely. To learn more about Equatables, you can refer to Readme of the package. For now, we dont need to delve into it deeper.
Once you run the plugin, these 4 files will be automatically generated with template code.
- bloc.dart
- counter_state.dart
- counter_event.dart
- counter_bloc.dart
We will take a look at each file and modify them as per our need.
bloc.dart
This file “exports” all the Bloc related files. Wherever you need access to these bloc files in your application, you only need to import this one file, instead of importing all the files one by one.
Generally, we will never need to edit bloc.dart file.
counter_event.dart
As, you can guess, we will define all the Events related to CounterBloc in this file.
Modify the file to match the following.
What did we do here?
We defined an abstract class CounterEvent and then we defined three counter event Increment,Decrement and Reset using the abstract class CounterEvent.
Note that we created a final field increment in event Increment and set its default value to 1. In case, we want to increment our counter by, let’s say 10, we just need to do Increment(increment: 10)
Simillarly, we could create any number of events and these events can have any type of “configuration” associated with it depending on what your BLoC needs to process the output State.
counter_state.dart
Just as we defined input to BLoC in “counter_event.dart” file, we will define output of BLoC in “counter_state.dart” file.
Let’s think about this. In all our output/state of CounterBloc we want to know what number to display on the screen, right?
That’s why we defined a field count in the abstract class CounterState itself and then used super(count) to let all of its childern class inherit the field value.
By default, Ready state would mean counter hasn’t started counting yet, it is waiting for the user input, hence count = 0.
Running state will give us some number to display on UI component. We will set the value of this count in our BloC depending on appropriate Business Logic.
..
..
I think it’s time to take a little break-recap.😅
So far, we have defined our input and output of the BLoC, Now we have two major task to do.
- Processing these input to correct output
- Building the UI depending on the output and sending input to BLoC.
..
..
Allright, back to work!😋
counter_bloc.dart
I think you may have guessed already, this is the file where we process the input Event and send output State, the BLoC.
Note the first line,class CounterBloc extends Bloc<CounterEvent, CounterState>.
The class CounterBloc is a Bloc that takes in input of class CounterEvent and emits/yields the output of class CounterState.
It’s time to start habit of specifying types wherever needed. i.e. Instead of writing,class CounterBloc extends Bloc
prefer writingclass CounterBloc extends Bloc<CounterEvent, CounterState>.
It will save us from running into errors in future.
For every BLoC, there are two override methods we will have to define.
initialState.
In our case, this will be counterReadywithcount = 0.Stream<CounterState> mapEventToState(CounterEvent event)
This method is responsible for processing the inputCounterEventand “yielding” output ofCounterState.
Just as we usereturnfor a function, we useyieldto put some data into stream, only difference is, it won’t stop the function from executing next line.
One more important thing, you can access the current State of a Bloc using state getter. (see the line number 14 & 16)
That covers all the business logic we need in our Counter.
Building the UI
First of all, we need to give UI component access to our BLoC. We have BlocProvider widget for that in flutter_bloc package.
Let’s edit our main.dart to provide CounterBloc in our widget tree.
Note that on the line 10, we specified the BLoC type using BlocProvider<CounterBloc>. This is important.
Once this is done, the BlocProvider will create an instance of CounterBloc and make it available in the child : CounterPage(). Since the BlocProvider was responsible for creating the BLoC instance, it will also close the Bloc automatically.
Listening to output State of Bloc
Now we need to actually build the CounterPage(). Just copy paste the following in a new file counter_screen.dart.
Take a look at line 20. We used another widget BlocBuilder<CounterBloc, CounterState> which will build it’s builder everytime the mentioned BLoC emits a new State. We can access this new State using state and depening on our use case, we tell the builder what to build. Right now, we just want to display Text.
To put it properly, the BlocBuilder<CounterBloc, CounterState> will look up the widget tree, above the current context, to find nearest Bloc of CounterBloc provided by BlocProvider<CounterBloc>. Once it finds the appropriate Bloc, it will keep “listening” to it and will rebuild just itself on every new State.
Sending an input to Bloc
In the CounterPage Widget we assigned an instance of Action() to floatingActionButton. We have yet to create this Widget. Just copy paste the following again, in a new file, or in the same file wherever you want.
We created a column of three FloatingActionButtons, wrapped with appropriate Padding.
The FAB that Reset our counter isn’t needed when counter is already in Ready state. So we would like to either show nothing or the FAB depending on the State our bloc is in.
So we used the same BlocBuilder<CounterBloc, CounterState> again.
Now how do we send input/event to bloc?
By simply using this
context.bloc<CounterBloc>().add(OurEvent());
or
BlocProvider.of<CounterBloc>(context).add(OurEvent());
Be sure to specify the type of Bloc you are looking for, i.e CounterBloc
Conditional Rebuilding
There is still room for improvement in terms of rebuilding. Where? …🤔
As we talked above, the BlocBuilder rebuilds it’s buider on every new arrival of State.
By this logic, the BlocBuilder for Reset button will rebuild on every Increment or Decrement event, even when there is no need to.
We only need to rebuild it when Bloc State moves from Running => Ready and Ready => Running, not when it moves Running => Running.
Fortunately, we can use condition parameter of BlocBuilder widget to accomplish this. See line 10.
..
..
..
Run the app and see the magic.😍
Yep, we have successfully separated UI components from Business Component Logic in the app.
Notice that, we haven’t used StatefulWidget anywhere in the app.🤯 If you ask me, that’s huge improvement, in terms of rebuild.
Oh yeah, there is one little trick to see whether you have successfully separated UI and Business Logic.
Make sure you don’t import “material.dart” or “cupertino.dart” anywhere in all the bloc files. Also, never use the context in bloc file.
If you manage to accomplish that, it’s pretty nice BLoC you have there.😉
Phew, that was a long journey, I hope it was worth it for you. I get goosebumps when I realize how neat I can structure my app using this.🤩
Wait a minute, I told you about “data-driven decisions” above right? Yes, “Recording every user actions that facilitates data driven decision”. Since you have come this far already, why not take a look at how we can do that?😉
I am just gonna quote the Readme.😅
“BlocSupervisor oversees Blocs and delegates to BlocDelegate.
BlocDelegate handles events from all Blocs which are delegated by the BlocSupervisor. Can be used to intercept all Bloc events, transitions, and errors. It is a great way to handle logging/analytics as well as error handling universally.”
See? Awesome, right?😋 Add this in your main.dart file.
and modify your main function like this.
Build and Run your app and now you will be able to track every single event,errors and transition that happens in all your blocs.
I am wrapping up here, and I am listing out some resources that you can use to dive deeper in BLoC.
- bloc package
- flutter_bloc package
- Bloc library documentation
- Link to Github repo for the app we developed